Tuesday, March 12, 2019

Pink Will Always Be A Favorite

Pink will always be a favorite when it comes to decorating kids rooms. 

Why?  Perhaps that rebellion we all had as our mothers had to wrestle us into those pink dresses and hair bands. That subconscious moment when you realize you are doing the same with your own child.  We revolted to think that we would ride our bikes with pink tassels (not me I had a pink Huffy), and  many of us pulled the hair band out the minute we turned a corner.  Then one day, those pink little toes, pink little squishy faces and that pink little newborn body we hold for the first time redefines pink.

Our hues go up on the walls, the bedding chosen, and the glass dish that  contains  hair bows with pink accents. Our own little girls now sporting the fashions we once wore and they too rebel against what we choose to dress them in. Believe me, I know as I had similar struggles with my little girl who is now 29.  They will grow up and over the generations pink will still win out. Just walk through the department stores.

My youngest clients, little girls from around the age of four on up would always choose the pink rooms.  Mom might cringe, daddy would smile, and together they would say, "we told her she could choose".  Pink now fills the places and spaces of many little girls rooms. My little girl is all grown. I too allowed her to choose her own room.  She wanted pink.  She was the little girl I had to wrestle with on those days when I wanted her to look pristine in pink.

Here is my daughter's dream room.  As I began choosing the interiors for the Portland Street of Dreams Emily walked through my store and she chose every single design accent. She chose the fabrics, the flowers, the pillows. She even chose how the custom rag doll would be dressed.  I was not so fond of the furniture, but she loved it.  Together, at the age of six she helped in designing this room.  We then took all these elements and decorated her own room identical to this. Only she had the bunkbed.


 Portland Street of Dreams 1995
Throwback to 1995 Portland, OR "Street of Dreams"
Keep in mind that digital cameras were not even thought of when this picture was taken.  An example of some of our custom work, note the window treatment. We still offer this valance design custom to match your child's places or spaces, in prints and fabrics for both boys and girls. Over the months I will share more of some of my favorite pink rooms I did for clients. Until then, if you have a favorite pink room you want to share be sure to find us on Instagram: @skiptomyroom OR on Twitter: @skiptomyroom We'd love to share your pictures. Also follow our weekly give-aways by following these hashtags #skiptomyroomFA & #skiptomyroom

Thursday, March 7, 2019

Our First Skip To My Room GiveAway Starts NOW!!


Our First Skip To My Room GiveAWay Starts Now!!!
 Woot! Yay! Best of luck to each of you.


Let's just get right down to it. Here is a picture of our first give away.


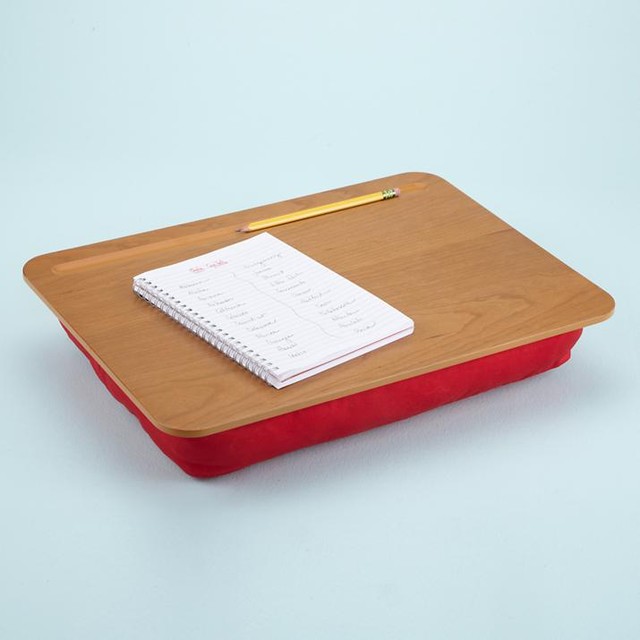
One very Red @philandteds "airlight carrier". Light weight and easy to store. Tucks easy into any handbag or diaper bag.

Here are the details of this weeks Give Away.
Giveaway starts on March 7th, 2019 at 12:01 am PST
Ends on March 13th, 2019 at 12:01pm PST.
Limited to US residents only.
Winner announced March 15th at 6pm PST on Instagram.

1. You must follow @skiptomyroom & @elizonthego on Instagram
2. Like this weeks "give away" post a comment on each account on Instagram.
3. Tag two friends in the comments on Instagram.

Be sure to follow these hashtags to keep up with this giveaway and future giveaways.
#skiptomyroom #skiptomyroomGA

BONUS entry if  you LIKE on Facebook & Follow On Twitter @skiptomyroom & @elizabethtraub
https://www.facebook.com/skiptomyroomkid/

https://twitter.com/skiptomyroom

EXTRA BONUS  Share this post to your Instragram stories for another extra entry!

Per Instagram rules, this promotion, giveaway, contest is in no way sponsored, administered, or associated with with Instagram. Nor is this a sponsored giveaway by the @phil&teds company. By entering, entrants confirm that they are 13+ years of age, release Instagram of responsibility, and agree to Instagram terms of use.

If you have a product or service you would like to add to future giveaways please message us and let's get the conversation started.

Tuesday, March 5, 2019

Allowing Our Kids To Design

Do you ever allow your Kid To Design their room?  I mean really allowing them to make the decisions?  You finally have the budget to put together your child’s room.  You have chosen the bedding, the perfect artwork and after the planning and making the purchases for your kid’s room, your child steps in to say, “no”.

I have had the opportunity to decorate hundreds of kid’s rooms.  I have learned how to talk to a child about ideas for their room and helping design a room that pleases both kid and parents.  Happy kids and parents are my specialty. I take pride in the final unveiling of a completed room…the ooh and ahs fuel my passions.  That is until I decided to work on one of my own kid's room. It has been over ten years since this time, but important still in allowing our kids to help when designing their rooms.

Eric, my own son, decided that he was going to assert his seven year old design choices.  New Years weekend, a time to clean, purge and decorate in the way this designer chooses.  NOT!!!!  Not on Eric’s clock. He would have nothing of it.  My ideas, my collections to pull this room off meant nothing to him.  What did mean something to him was his own artwork.  His Lego boxes, that were carefully opened on Christmas day and littering his floor.  I was ready to break the boxes down and send them to recycling.  His favorite picture, which I was going to take down.  What do I know?  On this day absolutely nothing of what I thought I would be part of decorating Eric's room.

I sat on Eric’s floor and asked him what he would like. I apologized for thinking I could go into his room, designer mode, and redo his life.  I asked the questions. He gave me the answers.

Mom: "What would you like to do with these Lego boxes?"
Eric:  "Hang them up on my walls."
Mom:  (with a designer cringe) "Okay, we can do that."
Mom:  "What do you want to do with all your artwork?" (Piled on his desk)
Eric:  "Hang it all over my bed."

I had this image of pushpins filling the walls and shreds of paper collage art everywhere.  Which would not be so bad, but finding an organized solution that could easily change with each new piece of art was important to the designer.
Eric went off to have lunch with and I got to work. I promised him I would surprise him and he would love it.   My own son, not allowing his designer mom to do her magic and limited.  When I completed the project, Eric stepped into his room. It is the unveiling to my biggest critic. His smile was my reinstated confidence.  It was good to allow this Kid To Design.
Eric chose all his favorite art pieces from this past year.  Taking  two strands of thin rope (red striped) some brass screw-in hooks, and mini clothes pins, I was able to expand the rope, hanging the length of his bed. Giving him exactly what he wanted. He can now go and arrange his art as he pleases. No pushpins, tape or nails going in and out with each new favorite art piece.


It is hard to believe how careful Eric was in opening his Lego boxes.  He had decided, long before my designer influences, that these would be hung on the wall.  I simply slipped my hand inside each box and used a push pin to hang them.  At first I was planning to frame them and make this "real art" but for a seven year old, my guess is he may want to change these out for newer boxes in the future.

This picture challenged me most.  Eric wanted to keep the framed alphabet picture. This picture, at the time,  was 24 years old.  My first EVER designer accent in my first son's, who is now 31, nursery.  I found a piece of wrapping paper for 79 cents, and then framed it in red.  It has traveled through many rooms over the years, and will remain here.  (Window reflecting in the picture.)  Eric also wanted to keep his kindergarten "About Me" collage and told me exactly where he wanted it hung.  Yes, another Lego box displayed on this wall as well.


A very Lego wall.  Total boxes hung are five.  Again, I am most impressed at how careful Eric opened each box.  Over the years Eric has had many shelves lined with his Lego collections.He loved his new room. I think I may do a part two post which shows his teenage room. (Pretty sure that post will come).

It is important to allow your child the opportunity to help design their room. Especially if it's important to that child. I have five children. All but one really never had any problems with me going in and changing things around. I have five kids. Four of my kids do not care what I do in their rooms. I can go and change things any day of the week. Eric's room project is a good example of listening and doing what it is your child wants.  It is good to allow Kids To Design.

If you have decorated your kids room we would love to see.  Be sure to find us on Instagram: @skiptomyroom OR on Twitter: @skiptomyroom We'd love to share your pictures. Also follow our weekly give-aways by following these hashtags #skiptomyroom #skiptomyroomGA
Sunday, March 3, 2019

Starting on the Give Away Journey

I just cut and pasted this post from my person blog page. (http://elizabethonthego.blogspot.com/) And in the future most Skip To My Room blogs will be updated here, but this started out as personal which is why the following post was on my person blog. Here you go.....


If you follow this blog, you may know that I have been involved in the kids retail industry for well over 25 years. Even when I took a break from the actual brick and mortar stores I was selling on Craigslist when it first started out of my garage. I guess you can say that my hands can not keep out of the retail cookie jar of kids products.

In summer of 2017 I said good bye to the last brick and mortar store. There was no way this small boutique girl could compete with the online giants. I kept trying. Trying new ways to get out and into the communities I lived in but it is the same story for many retailers large and small in my situation. Customers would come into my store, touch feel, ask questions and then buy from the online giant. There was no way I could offer a better price. Why?  Manufactures have levels of buying. The fewer quantities you buy, the higher the price. Also a little thing called rent, and utilities and employees. And so I closed my doors and put whatever was left in boxes and started selling a bit here and there on Etsy. HERE: Skip To My Room   However I know my weaknesses and I am terrible about promoting my own business. Which is crazy because I have also worked as a Brand & Marketing consultant and can hit it out of the park for my clients. Being my own client never really works for me. If you need help with the marketing stuff here is where you can find me.... elizabethtraub.com Check out the links that are highlighted.


I closed down my last and final storage unit last month. I found friends and family to give stuff away to reduce stock. After being packed up and stored it was time to figure out what to do with all these bins of left over adorable products. I took one box out last week and uploaded a few more things to Etsy. I will continue to do that as time allows, but then today I was sitting here thinking...why not give away some of this stuff. Brand new, and vintage darling kids stuff. Why not host online give aways? People have been doing this for years. I could do that, right?  Why not? I then went through all the reasons why or why not. And the why's of "yes" have out-weighted the why's of "no".

I decided to share this outward process on my personal blog. As I have to sharpen up some of my skills and learn the curve of how to and when to. I started reading up and think I am ready for running give-ways on Instagram @skiptomyroom . I am actually kind of excited about this. I think I am more excited to have the space back in my garage. Each week I will promote a new item for a give away. Post the give away on Instagram and write a post about it here with all the necessary links. I will share the give away on both my personal blog as well as on my Skip To My Room blog. This is going to be fun. Join me in first following along by clicking and following all the important stuff. LIKE Instagram where you can follow the give away. Here it is again. And this important hashtag will help you find the giveaway fast #skiptomyroomGA  @skiptomyroom 

Stay tuned as I begin to unpack boxes and bins. It's like Christmas here unpacking all the cool kids stuff.  Please join me over the next year of giving. It is my pleasure and joy to serve you.

Saturday, October 6, 2018

Elephant Tea Set


 Kids Elephant Tea Set

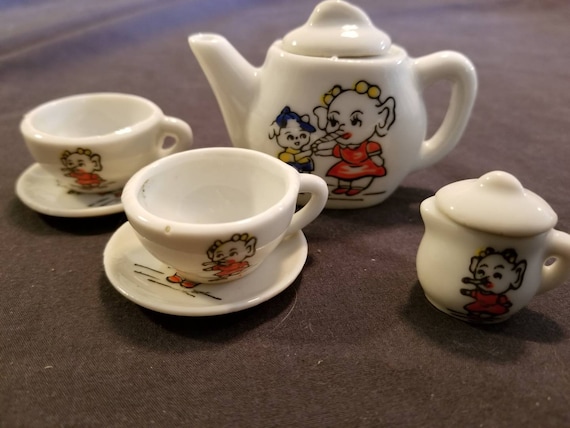
This eight piece tea-set is a vintage treasure. I love to collect older tea-sets. They often find their way home with me. I found this set in an old country shop. It was nestled among dusty books and old flatware. I have held onto this one for quite a while and then recently decided to put it on on Etsy. It's made in Japan and we all know that anything made in Japan is considered vintage in it's own right.
image 0
Kids Elephant Teaset

I think every child should have a miniature tea set to play and pretend with. I measured this tiny set. From the first picture it looks to be quite big. However look at the next picture so see how it measures up. Check out the collections I have posted up on Etsy and see what you think. If you are reading this, please know that most of the items are one of a kind items. The picture here today, may not be up on Etsy if it sells. This is just a happy blog pace to share some of my great finds.
Kids Elephant Teaset

Sunday, August 21, 2016

Designing That Back To School Work-Space

Designing That Back To School Work-Space by Elizabeth Traub @elizabethtraub

In just a few days kids all over the world will be pulling their chairs up to a squeaky clean desk. No doodle, no pencil eraser smudges, no color markers on the desks.  Fresh and clean desks. Our kids neatly tucking their school supplies away, folding their hands on their desks and waiting for the teachers instructions.

At least that is how I remember it as a kid.  It's not always easy to keep track of your kid's school papers, flyers and homework sent home.  I have five kids. At one time all under the same roof and believe me it would get crazy with keeping track of everything.

One thing that is important for kids of any age is structure and consistency.  It is going to help you and your child to design a back to school work-space.  A place in your home that remains THE spot for all papers, homework, books, book-bag and jacket.  If you teach your child the first week the habit of this space, you will save yourself from hair pulling moments.

I have to admit that last school year I tried something new.  My boys (three boys still at home) all have desks in their bedrooms.  Drawers filled with Lego's, paper, pens and treasures.  One child keeps his money hidden in his desk. Which I may have borrowed and put back a few times. I went to Target and purchased three wall mounted bulletin boards with hooks. Pretty dark wood framed. I thought, that having a desk, and then a coat hanger by the bedroom door, and a cork board for important papers in each room was a good idea. Coats, backpacks, important papers all in one place in each room.  If I had one child, then yes, a brilliant use of space. Three boys...noway!!!

 
Mommy monitoring had to happen when seeing that homework was done. Mommy monitoring to see that papers, backpacks, and coats were in order. I was going from room to room like a crazy lady.  Thus the new location was a space in my kitchen with space I could afford. A counter with drawers. Pencil sharpener, pencils and paper. A place for all homework and reading materials.  Then while cooking dinner on most nights, the boys would work on their homework, read out loud to me, and my services were available as the in-house tutor.

The boys ALL developed the habit of dropping their stuff in the same place and went off to play. I could then go through the parent information and note homework and reading that needed to be signed. It helped us all keep track. Once all was done and completed, backpacks were at the top of the stairs that could be easily grabbed in the morning.

It seems that this is no-brainer mommy or daddy stuff, but seriously this takes careful considerations for everyone involved. Designing that special back to school work-space also gives your child a sense of pride in having that space as their own.  There was a season when the three boys were much younger and the dining room table became that work space. I purchased each their own little desk organizers to keep their own markers, pencils and paper.  Often, even when there was no homework, each boy during different times of the day could be found at their only little work-space.  You might see that grades are improved with a little structure and a little working space.

Have a wonderful start to the 2016/2017 school year.

Wednesday, October 1, 2014

Howdy There Littlle Cowgirl

This past month I set out to put together a girls room with with a cowgirl flair. Not wanting to create the same looks I often see with red bandana, and rustic course accents I sought out pink hues.  Oh my goodness, this was not an easy task. It started with finding the bedding first, then a lamp and then all of a sudden the accessories came together. Right down to finding the perfect lamp to bring it all together.


Tissue box, boot and frames are screaming darling cowgirl.
This lamp is one word: AMAZING!

Local The Dalles, OR Designer Becky Byers made these darling dresses w/ bloomers.

 As of this posting all of these items are available at skip to my room in The Dalles, OR. We do ship anywhere in the US and if you see something here you must have, be sure to find us on Facebook and leave us a message.  This is just the sweetest collection of cowgirl fun we have yet to find.

Wednesday, July 23, 2014

Getting Kids involved in Skip To My Room

We are setting up our shop in The Dalles, OR. It's been really hot the past two weeks, stretching the dial over 100 degrees. Working indoors is a nice break.  The kids are involved in helping set up the store.  I love being in a place where I can bring my kids into my work and play.  I loved this picture of everyone doing their part. Here they are wiping down the ledge before we start laying product out. I love Ethan off to the left, "taking a break." More furniture arrives in a week and I am so excited.

In other news here are the new business cards for the store.  My day job is working as a business consultant in brand and marketing. It's always fun to be able to design my own stuff and work on it.

 As I am working in my office I am listening to the new Jason Mraz album called "Yes!" From the consulting side of things I am working on his account in the online space. Giving him a little plug to go and listen here: YES! on Spotify.

Today is crazy busy in getting the finer details of the shop moving forward as I set up utilities, transfer insurance location, and all that good stuff. Thanks for coming along the Skip To My Room journey. Be sure to connect with me in all of my spaces and places online.

@skiptomyroom is a good start. Wave hello.

Monday, July 14, 2014

The Story Continues for Skip To My Room

Today I got the keys to a new little boutique. I feel 26 all over again. I started Skip To My Room when I was 26 years old.  Then circumstances closed that store many years ago.  I loved those days, years ago of my young kids hanging out in the shop, learning to work, and helping care for the store. Those days long gone.  New days are ahead.

I have always kept my toes dipped into the kids room design gig. I started a webstore called Hung Out To Buy and then had a small shop in NW Portland. Now living in the The Dalles, with inventory begging to come out of hiding I found this cute little location. "Skip To My Room" has been on the tip of my tongue all week.  I looked under a name registry and it was available so I grabbed it. I decided I wanted to go back to the very thing that launched a very blessed career.   A few years back I started this blog. I had a Facebook page. The name was available on all the Social Media platforms I like to frequent.


 Tonight I just had to take some things over. So I decided to fill the first window. This display will change over a 100 times in the next year. For now it was a few things I could get my hands on. The story continues for Skip To My Room.  A change that I felt I wanted to make. That window is not even near being completed, but the hour was late and I had to leave. It's going to get better as all the product comes over. I am so blessed and grateful for this location, for this lovely community of The Dalles, OR.


Thursday, November 3, 2011

Tweener Fun Two/Too


Tween Fun

This room makes me smile.  Thus young tweener had a lot of input on what she wanted in this room.  We only changed the accessories and added a few furniture pieces, painted and got to work on how to store her stuff. 


Friday, October 14, 2011

Decorated Items-I Take Charity

If you live in the local Portland area and have some used children's decorating items please send me a message. If you are changing out your child's room, have things in boxes stored in your garage..for years...I would like to come and possibly take them off your hands. Perhaps for a small price. 
I am working on a project and gathering up, cute, good condition items.  Things such as lamps. pictures, linens, pillows, area rugs, even some toys, furniture pieces, and anything and everything to decorate a child's room.
If you are able to take pictures of the items you may have or want to email me about what you may have, even better.  Please email at:  skiptomyroom@yahoo.com

Also if you are interested in following (http://www.skiptomyroom.blogspot.com/) in which I have set up dedicated specifically to the design of children's rooms as well as ask to be my friend on Facebook at skip to my room.

Thanks so much,
Elizabeth

Wednesday, October 5, 2011

Choosing Hues of Blue for a Sweeping View

"Choosing hues of blue for a sweeping view in an open floor plan. I have chosen three complimentary hues of blue. Lighter in the entry which spills to the upper staircase and hallways, darker in the kitchen, back to the lighter in the dining area, and that 3rd hue of blue to bring the family room in. Wide open floor plans can easily be broken up with the same colors, different hues, without being to choppy. She wants a "sweeping" look in her home."
I just cut and pasted an update on my facebook (skiptomyroom), right into my blog. Is that weird?  Words worth repeating even if they are my words.  I have been reading and hearing request for choosing paint colors. I received an email loaded with pictures of this stunning home. I could see the stunning elements in this home. Perhaps a designer's eye?  Beautiful open floor plan, exposed beams, and the entire home trimmed in this beautiful wood.  I tried to be extra gentle and nice when I commented and gave my thoughts to this gal and sadly used words like "drab" "cluttered" and "do you really want to hang onto that rug?"  This homeowner is on teacher's budget.  She admitted that she did not like her furniture and really thought she needed to just start over with painting and new furniture. Only making for a depressing "not going to happen" feeling due to all that was going on, or not going on.  As I looked over the pictures, I saw that she had lovely old furniture pieces.  Turns out family hand-me-downs.  A clutter of precious things which could easily be contained and stored and displayed rather than just placed in available spots.
Being extra sensitive to her budget I hit the pavement.  Spent an afternoon choosing paint colors that will accent and enhance the wood tones, bringing a boring and drab look to an updated soothing and cozy look. Sweeping views with hues of Blue. Open up her spaces and yet still defining each room, wide open to the next.  Looking at her beautiful styled sofa and rendering a look that would cost very little in accessories.  Choosing fabrics that she could choose to make panels in the living spaces to bring it all together and build in the colors of the wood tones and the blues we chose.
Here are some of the samples chosen:
 These blues are not turquoise although they appear that way in this light. You can choose a print for your windows that ties all your elements together. She has both light wood tones and darker tones, which this fabric connects both.
 Hello inexpensive Target pillow which works with all the print options.
 This fabric has hues from the "tired" sofa, which is really very nice, mixed tones of browns and brings in the blue that will go on the walls. I think that Target pillow would be great with this window panel.
 Stripes give height to a room. With this open floor plan, a stripe gives more depth and height to a room if placed in the right space above the window frame.  Again the blues are picked up and the wood tones brought in.
Hello beautiful fabric. The colors are a much softer then the bolder ones above. This would be my first choice, but it's up to this lovely lady to fall in love with her own choice.
Now hear, here, hear is the secret to this room. Using all these fabrics can really pull a room together. You can get coupons for 40% off fabrics. Buy all you need for your windows in one cut of the fabric.  Sew/Hem the edges and you have instant inexpensive window panels.  Make up a few pillows.  Using two prints. No fancy sewing. The fabric is your design source.  Cost effective, beautiful and easy.  All you have to know how to do is sew straight lines. Just like driving a car. 
More exciting on this teacher's budget is that I don't cost as much when emailing and conversing through email.  She has actually saved a lot of money in designer fees.  Knowing what questions to ask, seeing the pictures of every square inch of her home, making her feel comfortable to send the pictures. and she is well on her way to a new look in her home. (Meaning,  she did not have to tidy up or feel self conscience about her home).  Getting to work to find the elements in a cost effective way and hopefully I can talk her into before and after pictures. 
Happy Designing,
Elizabeth Traub
p.s. if you are not following me on facebook, you can just click on the icon to the right and start watching and seeing how design unfold daily in my world.

Sunday, October 2, 2011

Teacups to Tables STEP FOUR FINAL

STEP FOUR FINAL is having me try to find the best pictures.  Layering is a miracle way of painting.  Remember I said do not look at the pattern as a whole, but layer the pattern  with the lightest colors first.  OH JOY!!!  Get excited with me. I am so pleased how this turned out. 
 My teacup and my table now completed.  I am very happy with how this turned out. I took a close up to show how very imperfect this is. Go ahead look very very close at this.  Layering of each color transfers the pattern without even really trying.  I took each color and moved it around the table in about the approximate place it should be.
 Table top, lower shelf, tea cup and paint. Yes I spread my paints out on a white plate.  Makes it easier for me to tone down, mix the right colors and keep my pallet close.
 This is that lower shelf. I am so glad I trimmed in blue and decided to take the time to paint the lower shelf.  It did not take any extra time in that the layering of color was just dabbling.
 Right back where I started.  From a teacup to a table.  I love this!
 Looking down at the table notice my almost perfect blue trim around the table. Really?  Who paints perfection like that? Not me. When my table was complete and I was happy with my pattern, I took a fine white paintbrush.  I then went over the oopsies on the table itself. You know like getting your hand in the way and then getting paint where you did not see it.  I painted  white over all those little imperfections.

What is your next project?  This table took me about three hours to complete from start to finish.  I did not not complete it one sitting. I let the white paint drive over night. Even though the bottle said it would take only 30 minutes to try, there is the risk of a tacky feel, and then every little thumb print is recorded.  Sunday I took the earlier afternoon and stuck to the painting of the pattern.

Next time I am going to do a step by step covering of mirror with some really colorful and fun fabric.  Happy Teacup and Table
Very Much a happy Designer,
Elizabeth Traub

Teacups to Tables STEP THREE

STEP THREE is what I call layering. I think any beginner would think this to be a difficult project.  Do not look at the project as a whole. Look at this project in layers. Starting with the lightest color I find the pattern on the cup of just yellow.
 The little shelf on the bottom of this table will be modeled like the inside of the cup.  It narrows down the pattern for me to easily see the yellow colors first.
 For some, this may be a tedious job of spacing and measuring. I eyeball the distance and do not hold myself to perfection.  I use to be a perfectionist and a project like this would have taken weeks, I would loose my enthusiasm, and the project  would be junked in my garage.  Believe me this is way more fun and becomes your own.
 I also made sure to transfer my first layer of color on the lower shelf too.  Starting with the lightest colors always help "fix" mistakes along the way.  Also keep your "inspiration" piece safe.  I know that if that ironing board gets knocked over I can clean up paints but would be sad to break this teacup. So I kept it on the floor close to the project, or a shelf very close by. 
I layered next with orange. It was kind of a sherbet orange which certainly punches out the yellow.  Once the yellow and orange were layered on I started to add the blue.  Are you ready to see all the colors applied and the finished table?

Teacups to Tables STEP TWO

STEP TWO involved first sanding the table. I have to admit I should have worn a mask, although I was outdoors and did not deliberately breath the stain that was most likely over 50 years old.  It smelled  of my grandma's attic. Then I water cleaned, wiped down and dried off the table.  I then spray painted the table white. I was glad I had my roller handy as it really helped with the areas that wanted to drip.  Once the paint was dry I added blue trim.  Now the teacup had a purple accent, so faint that if you blurred your eyes it looked blue. I wanted to highlight the blue so I trimmed it out with a dark and lighter blue.  Make no mistake, there are few clean lines. I know when I am done I will get out my fine paint brush and touch up all the areas that I over painted in white.  Here is the table now painted and trimmed.  Ready for the next step?
Painted white and trimmed in blue.  I like to paint on my ironing board.  It is a good height and there is lots of hang over for this table, so I can walk around the project, reach under and over without having to move the table.  I even have the teacup under that stand to remind me of what first got me thinking of this table.

Saturday, October 1, 2011

Teacups to Tables STEP ONE

It seems pretty easy to get started on such a simple project.  The reality is you have to take inventory of what you will need from start to finish.  Nothing kills the joy of an afternoon project than missing key pieces  to get the project moving.  Taking inventory here of what I need:


In the upper left you will see some sandpaper.  Brushing off the extra bumps, dirt, and loose parts of the finish. I am not a "play by rules" kind of furniture painter.  This you must know up front.  I am a do it as fast, as easy  and if no one is playing with the piece, licking it, or moving it around then a general soft sanding is fine with me.  I have my rollers ready too. These are removable and washable.  Acrylic color samples that will be the colors  for the flowers on the table. One can of white spray paint. (The rollers help smooth out the parts I overspray)  And the inspiration piece is the Teacup. Total cost for spray paint, rollers, and sand paper $14.50.  Misc paint colors on hand and now I am ready to paint this:

This lovely table I picked up a a garage sale for about $8.00. All the screws are tight making this a very stable table to hold a lovely lamp for later.  Now that I have every thing all ready to go. STEP TWO will be well under way in the next hour.  My husband is watching football, the boys are all playing so this is going to be a project I can start and finish in one day.  The only delays will be paint drying. 

In case you did not notice the placement in which I have laid out my supplies and the area rug are pieces from my breakfast area.  Over and over people ask where I got those lovely place-mats? I bought $16.00 of them at Dollar Tree about a year ago. One of my better finds since a local design shop had close to the same bamboo placements for $12.00 each. I was going to buy the more expensive ones because I knew I would get the mileage, use and function out of them. Turns out that bamboo that cost a dollar works just as fine too.  The area rug is by our back door which ties in with the place-mats. Another inexpensive clearance item from Target.  I love when I can find things in random places that work together.

Happy Saturday,
Elizabeth